


Congratulations! You just bought a brand new camera and you have no idea what to do. These were my thoughts almost 8 years ago. I knew I wanted to capture images of my daughter and I wanted a good tool that could do it for me. Little did I know that it had very little to do with the tool but everything to do with what I told the tool (camera!) to do. I hope this post can help you with learning how to start out in the photography world.
After I pulled that big black camera out of its box I didn’t know where to begin. I searched every Photography 101 tutorial I could find. Everything was new and everything looked complicated. In this Photography 101 blog post, I want to outline a few tips and tricks you could use when starting out in the photography world that have helped me in the past. This blog post will be one part of a series of posts of How to Start Out in the Photography World. Today’s first post will be covering tips 1, 2 & 3- Reading Your Manual, Finding a Subject and Start Shooting and the Exposure Triangle. Stay tuned for the next post which will cover Online Learning and Books of Recommendation.
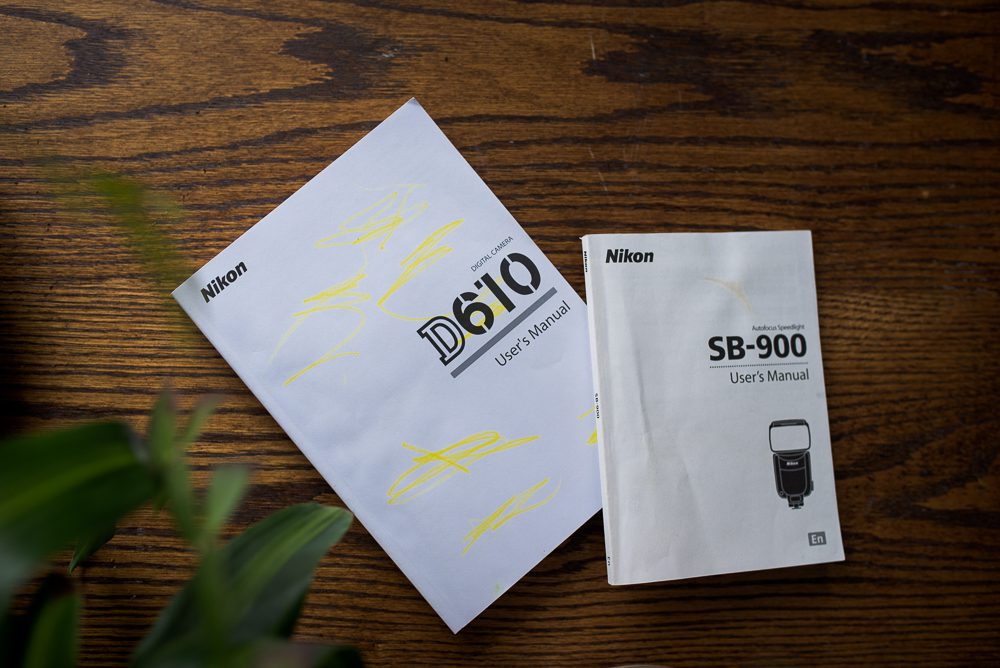
- Read Your Camera’s Manual
- When people ask me what do with their new camera the first single most important piece of advice I give is read your manual. Every fancy new camera comes with a fancy manual and I cannot stress enough the importance of really going through this instruction guide. It will tell you what each button does. While you are going through the manual learning what everything does, I encourage you to also learn where that is on your camera. When you get to the playback button find it on your camera and go through that menu. The best way to learn is practise it immediately with it in your hands! That way when you get to the harder things like learning the exposure triangle (ISO, Aperture and Shutter Speed) you know where those buttons and dials are on your camera to control those settings.
2. Find A Subject and Start Shooting
- This is my favourite thing to do when getting a new camera or even a new lens. I take them out and I start taking pictures of anything and everything I can find! I want to see what they can do! I want to hear the click of the shutter, I want to test the low light capabilities, I want to see how sharp that new lens is, and I want to create, create, create! This is passion. This is something that cannot be taught but only cultivated. To cultivate passion you need to live, breathe and dream about what it is you are passionate about. Every artist has an ebb and flow when it comes to passion. I know there have been seasons in my life in which I was very passionate about photography and it consumed me! There are other seasons when the passion seems to be hiding. It seems like its a chore to even think about breaking out the camera and to shoot something. This is normal and not new to many of us creatives. These seasons in life are life the deep breaths that we inhale in. They allow us to rest and flood our soul again with the life giving streams of oxygen.
3. The Exposure Triangle
- I encourage you to learn about how the exposure triangle works together to produce properly exposed images. There are three components within the exposure triangle (I know right?!) ISO, Aperture and Shutter Speed. I like working definitions from a dictionary and will often look up words I know (and don’t know!) to better understand them.
First of all, let’s define the Exposure Triangle because I think I may have lost a few of you already! The exposure triangle is a common way of associating the three variables that determine the exposure of a photograph: aperture, shutter speed, and ISO. One must balance all three of these to achieve a desired result, an adjustment of one requiring adjustments of at least one of the others.
ISO is defined as “ISO is the sensitivity of your sensor to light. The ISO setting you use depends on the amount of light in the scene you are photographing. The more light you have to work with the lower you can set your ISO. As settings go, ISO is one of the key camera menus you need to learn.”
Aperture is defined as “a space through which light passes in an optical or photographic instrument, especially the variable opening by which light enters a camera”
Shutter Speed is defined as “the time for which a shutter is open at a given setting.”
Definitions are great you say, but what do they mean? Here is how I generally describe each component, I hope you can follow my sometimes random thoughts!
ISO is the setting in which you tell your camera to be in relation the light on the subject you are shooting. Find the ISO button on your camera. There will be many ISO numbers on your camera as you scroll them in. ISO can go as low as 100 (or lower in some models) and up to 64,000 (or higher!)on some cameras. That’s quite a range! The lower the ISO number the less light sensitive your camera will be and the less noisy your image will be. The higher the ISO number your camera will be more light sensitive and your final image will be grainer. In lower light situations (like indoors, or if the sun is setting or a duller grey day) your ISO will generally be a bit higher to allow more light to come into your camera.
You will find your Aperture setting looking like this on your camera display (and even on your lens- see if you can find it!) f/1.4, f/2.8, f/3.2, f/4 etc. and again most have a range up to f/22. Aperture directly relates the lens you are shooting with. It has to do with how big or how small the opening of your lens is to let light through. I like to think of it as your pupil. You know how when you are in a dark room and your pupils go wide? This is to let the most light in as possible. Same thing with the camera’s aperture a wide aperture like f/1.4 – 2.8 will allow the most light to come into the sensor. When you are shooting “wide open” the focal plane will be a lot shallower. Meaning less items will be in focus. The same applies now when you are out on a bright sunshiny day and you are squinting against the light. Your pupil probably looks like a pin head as it has adjusted to allow as little light in as possible. Higher apertures like f/18 – f/22 let very little light in. But the depth of field at apertures this high will be great. Landscape photographers often shoot at high apertures so they can ensure all the planes of field are in focus. Also you can get really cool star bursts with high apertures!
Shutter Speed is the setting that tells your camera how fast or how slow to close the shutter. You must ask yourself a question before you determine this setting – are you capturing moving objects (busy kids!) or are you shooting a stationary subject (flowers, still life)? The answer will determine your shutter speeds setting. A fast shutter speed 1/4000 will close the shutter quickly. Freezing motion and moments. Slow shutter speeds will result in blurred images. Super slow shutter speeds work well when you can ensure no camera shake. A great way to keep your camera stationary while shooting slow is to mount it on a tripod or a rock. Using a remote is also a great way to reduce camera shake. I generally never shoot below 1/200 ss because I tend have shaky hands! I’m not so super stable!
How do these three components all work together?
When I get into any situation I first think about what story I want to tell and what will the light allow me to tell. If it is a darker room, I will go to my ISO first. I will bring it higher around a ISO1000 or more to allow just enough sensitivity. Then I think what I want to be in focus- do I want a lot of do I want to just focus on a detail? Then I’ll probably set that around f/2.8 or even bump it up to f/3.2. The last thing I usually adjust is my Shutter Speed. Having the other two set usually gives me enough wiggle room in my shutter speeds. As I said before, I like to have higher shutter speeds to ensure I am freezing moments and making sure everything is as tack sharp as possible.
Once you have a thorough grasp of how these all work together and you are consistently exposing good images, you can really control the types of images you are producing. Do want to capture the blur of a moving waterfall? Then you are going to have to have a slow shutter speed and higher aperture so a tripod would be a good thing to have!
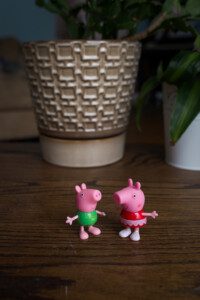
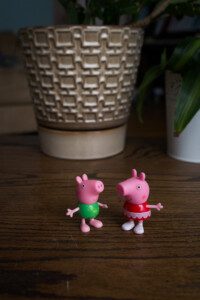
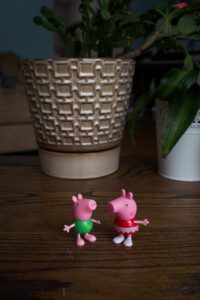
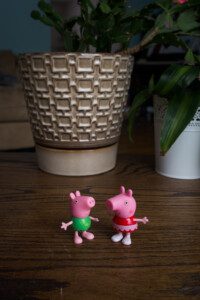
But what is really cool is that you can have different settings and still maintain the same exposure. The only things that change is the depth of field (another cool topic!) I’ll show you a few examples below:
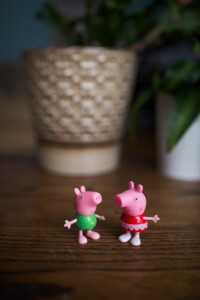
ISO 200 f/2.0 1/320
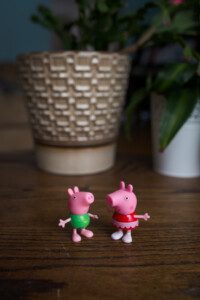
ISO 500 f/4.0 1/250
ISO 800 f/5.6 1/250
ISO 1000 f/6.3 1/250
ISO 1600 f/8 1/250
ISO 2000 f/10 1/200
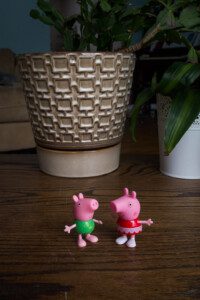
ISO 4000 f/16 1/200
In these photos you can see that as the aperture (f stops) change so does the depth of field. You can see that the flower pot in the background becomes more and more clear. In most of the photos I have adjusted the ISO and sometimes the Shutter Speed as well to make sure the image is still properly exposed.
I hope this post has helped a little bit and hopefully hasn’t made things even more confusing! I would love to hear from you if you have any more questions! Stay tuned to next week’s post about Online Learning and Books of Recommendation— both things that have helped me immensely in my journey in the photography world!
